Thursday, January 6, 2022

Charity Block 3 for GRMQ (Jan 2022)

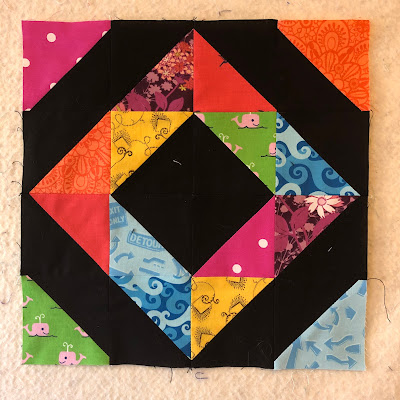
 And finally, we've got block #3, the improv block. Really what I'm looking for is a piece of one color that we can cut at least a 5" square from (bigger is good too, if it's really big, we might even be able to cut multiple squares from it, so you can really make it any size you'd like).

What you will need:

Choose one color (not white/cream or black) and pull out all of your random sized scraps of that color (if you don't have a scrap stash, you can pull out fabrics and cut random pieces with scissors or a rotary cutter)

They do not have to be ironed or even rectangular. They can be cut offs from previous projects. As long as they're in that color you chose. Mostly prints, but you can throw in some solids as well.

For improv piecing, just throw out the rule book. No precision cutting (I don't even use a rule and rotary cutter most of the time, just my fabric scissors), seams can be as wide as you'd like, as long as they're at least a scant quarter inch. You can do curved piecing. Iron pieces flat by warping the fabric, if you have to. You can even flip fabric around to the other side, if the front is too bright and you want to use the more muted side. The only rules I follow are that two pieces of the same fabric can't touch and that pieces can't be too big. That's it!

I generally start by just grabbing two pieces of fabric and deciding which side to line them up on, and then sewing about a quarter inch seam along a roughly straight line. Once I have a nice little pile, I go and iron them all. You can also build strips without ironing in between, as long as you're not going to go over one of the existing seams. I highly recommend pressing open on these to eliminate bulk in the seams, there will be no seams to butt up or perfect points.

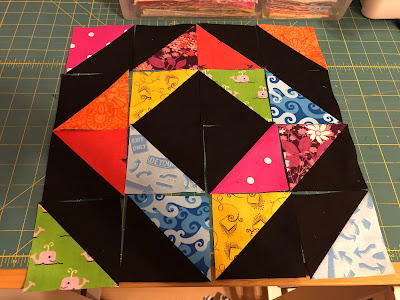
Here's my pile of pieces, roughly in pairs of two. There's some triangle shapes and lots of rectangular shapes. Then just keep building onto those. At some point you can start adding larger pieces to each other.


Don't be afraid to cut your pieces apart if you want to, before reassembling them. 


Also, when putting two pieces together that both have uneven edges, it's good to use your scissors or rotary cutter and ruler to create a straight line on one edge of one of the pieces so you have a line to sew along. Also make sure you trim off any overlaps with your scissors.


Trim the overlap with your scissors using the straight line as a guide.


And don't be afraid to use pieced scraps from previous projects to incorporate into this. The picture above shows me putting the striped piece onto a row of already pieced scraps from another project. 

I decided to stop once I had the three pieces (each one was large enough to cut at least a 5" square from), but you can keep building your sheet as large as you'd like. If I'd had more time last night, I probably would have made another "quadrant" and then pieced them all together somehow.

Do NOT trim these down. Leave them as they are. Making these three pieces took me probably half an hour and again this is a great project to do in little chunks between working on other things. Also a great scrap buster for those weird shapes and thin strips you've been hoarding (you'll get no judgement from me, I do it too). 

While this is for my current guild, the Grand Rapids Modern Quilters, anyone can make these blocks and contribute them to our charity quilts (or just make them for yourself). If you'd like to contribute them, email me and I'll give you my address to send them to (DamascSt@gmail.com). If you're in the guild, we'll have a box at every meeting that you can put your finished (or partial) blocks in, or you can drop them off with me or Cindy.

Charity Block 2 for GRMQ (Jan 2022)

So here is block #2, the HST Diamond block:

You will need for each block:

8x 4" square black background pieces - all the same (can have a small amount of pattern on it, but should read as black)

8x 4" square patterned scrappy pieces - all different (make sure they aren't too dark so they'll show up against the black)

For the ultimate scrappiness, I would recommend making two blocks at a time (so you'll need 16 of each instead of 8), since we'll be making two-at-a-time HSTs. That way you can put one of each fabric in each block.

You can use squares larger than 4" as well, just make sure to line up the corner that you're drawing your line through, so you're not trying to guess if the squares are lining up. Example below, you'll want to draw your line from the top left corner to the bottom right, so it goes through the corner that you lined your fabric up on.

Since you're using black fabric, you'll have to draw your line on the lighter side.

Sew a quarter inch on both sides of the center line, then cut the fabric down the line. Iron (I suggest ironing open to limit bulk in the seams) and then trim each block to 3.5" square.

Lay out your blocks so there is a black diamond in the center and colorful corners on the outside. It helps to take a picture at this point, so you have a reference for how you laid your block out.

Sew pairs together using a scant quarter inch seam, lay it out again. Sew pairs into quadrants using a scant quarter inch seam (I pinned at the seams).

Sew quadrants into halves using a scant quarter inch seam, and then the halves into the finished block. The finished block will end up at 12.5" square.

This block takes a little longer than the last one, because of the trimming and such, but overall not a hard block to make.

While this is for my current guild, the Grand Rapids Modern Quilters, anyone can make these blocks and contribute them to our charity quilts (or just make them for yourself). If you'd like to contribute them, email me and I'll give you my address to send them to (DamascSt@gmail.com). If you're in the guild, we'll have a box at every meeting that you can put your finished (or partial) blocks in, or you can drop them off with me or Cindy.

Wednesday, January 5, 2022

Charity Block 1 for GRMQ (Jan 2022)

I've been making these blocks forever. Whenever I have scraps, I cut them down into squares, rectangles, or leave them as is and stick them in my scrap baskets. All of the charity blocks this month will use up these scraps.

First up, the checkerboard blocks:


What you will need:

2.5" square pieces of low volume (if you take a B/W picture, the fabrics should show as white) - solid whites and creams are the best, but you can use some patterns too, just try to limit patterns with a bunch of additional colors or more noticeable patterns

2.5" square pieces of medium to high volume - patterns are best, but you can also use some solids

In the top picture, I set aside the top three fabrics, because I wasn't sure if they'd work as low volume. When I took the bottom B/W picture the outer two showed as white so they went in my low volume stack, the middle showed as a light grey. These blocks look best with mostly white on white or with solid white/cream as the background.

Pair one med/high volume with one low volume piece. Sew a scant quarter inch seam. It should now measure 2.5" by 4.5". Then pair your pairs together into quadrants (try not to use two med/high volume pieces of the same color in one quadrant). If you have directional prints in your pairs, make sure that you orient them so a med/high volume square is in the bottom left. I iron my seams open, so I like to stick a pin where the two seams meet up. If you're ironing to the side, you can probably skip that and just butt the seams together as you sew. Sew a scant quarter inch seam. Your block should now measure 4.5" by 4.5".


Now pair two quadrants together into a half. Pin at the seams and sew a scant quarter inch. Your block will be 4.5" by 8.5". If you have directional prints, make sure you continue to keep a med/high volume square in the bottom left corner.


Finally, pair the two halves together. Pin at the seams and sew a scant quarter inch seam. Your block will be 8.5" by 8.5". Once again, if using any directional prints, keep the med/high volume square in the bottom left.


It took me less than 30 minutes to make 2.75 blocks (it might take a bit longer if you have to cut fabrics first). Make as many as you'd like, if you have extra pairs, quarters, or halves, save them and make a few more here and there as you sew other things.


While this is for my current guild, the Grand Rapids Modern Quilters, anyone can make these blocks and contribute them to our charity quilts (or just make them for yourself). If you'd like to contribute them, email me and I'll give you my address to send them to (DamascSt@gmail.com). If you're in the guild, we'll have a box at every meeting that you can put your finished (or partial) blocks in, or you can drop them off with me or Cindy.