Block 16
Moving right along to our QST Heart. I believe the inspiration for this came from Gypsy Wife by Jen Kingwell, but I made it quite a bit bigger.
Cutting Instructions
Queen Sized:
Background: (1) 13"x13"
Background: (2) 9.5"x9.5"
Background: (4) 4.5"x4.5"
Print 1: (1) 13"x13"
Print 1: (2) 4.5"x12.5"
Print 2: (2) 9.5"x9.5"
Here, my background is the white, Print 1 is the green print, and Print 2 is the red print.
Baby Sized:
Background: (1) 7"x7"
Background: (2) 5.5"x5.5"
Background: (4) 2.5"x2.5"
Print 1: (1) 7"x7"
Print 1: (2) 2.5"x6.5"
Print 2: (2) 5.5"x5.5"
I had to redo the QSTs on this one three times, because I cut the pieces too small twice. So pay no attention to the medium sized squares in this picture (they are way too small). Yellow is my background, red my print 1, and then in the final block, you'll see black as more background, and the airplane print as Print 2.
Piecing Instructions
Mark your lighter 13" (7") square with a line down the diagonal, then sew 1/4" seam on both sides of your line. Cut apart on the line, press, and trim to 12.5" (6.5") square. This thing is huge, so pin, pin, pin and then sew really carefully so you're not pulling the fabric too much. Set the HST units aside.
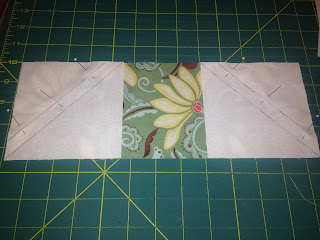
Now mark a line down the diagonal on the (4) 4.5" (2.5") background squares and if you want bonus HSTs, mark a second line at least 1/2" to one side. Take your Print 1 rectangles, and pin the background squares to both corners, with the bonus HST line facing out. Sew just a hair on the outside of the line, then sew another seam on the bonus HST line. Carefully cut them apart 1/4" from the center seam and press. Set the rectangle units aside.
For more detailed instructions on how to make QSTs, please see last week's post. Take your 9.5" (5.5") squares and mark the diagonal line on the lighter squares. Pair them up and sew 1/4" from both sides of the center line. Cut apart and press. You may choose to trim your blocks to 9" (5") square at this point, but that's not necessary.
When marking your new diagonal, remember to line up one of the lines on your ruler with the center seam, and then slide your ruler until one side goes through one of the corners. Do not just mark a line from corner to corner, unless you trimmed the HST down.
Pair the HST up with another one, making sure you turn the bottom block so the seams line up, but the background corner is on the opposite side from the top one. I like to pin at the very ends of the seams first, then double check to make sure my center seams are lining up properly, pin that, and then pin the other corners.
Now sew 1/4" on both sides of the center line. Remember to check your center point BEFORE you cut, to make sure that it is at least mostly lined up (I personally don't mind a bit of a shift, but if it's too large, you may want to rip, repin and try again). Once satisfied, cut along the center line and press. Then carefully trim down to 8.5" (4.5") square. Remember that your center point should be roughly at 4.25" (2.25") but it's more important that your 45 degree line goes along one seam line and that your 8.5" (4.5") marks line up on the top left and bottom right seams.
You will only need (3) of the resulting QSTs, so set one aside as a bonus block. Now we can lay out our block. The (2) rectangle pieces go on the top, the (3) QSTs go in the middle, and the (2) HST units go on the bottom:
Sew together in whatever order you'd like. I did the bottom HSTs first, then the rectangles, followed by the QSTs, and then I sewed the rows together.
Here is the final queen sized block:
Here is the finished baby quilt block:
Completed block sizes:
Queen sized: 24.5"x24.5"
Baby quilt: 12.5"x12.5"
Several other options:
- Make it wonky: you've got a lot of options here, but sew and flip triangles are pretty easy to make wonky, or you could make wonky QSTs.
- Play with the background fabric of your QSTs: want to have a different outside fabric, or use your Print 1? Just cut an extra 9.5" (5.5") square and an extra 9.5" (5.5") background square and then mix and match with one of the Background/Print 2 HSTs, making sure the background pieces are on opposite sides.
- Make it scrappy: if you wanted to get really crazy, you could make up to 6 different HSTs and mix and match them.
- Create your own fabric: strip piece or paper piece the Print 1 sections.
- Make flocks of geese instead of large HSTs: instead of making (2) HST units for the bottom of the heart, make (2) 12.5" (6.5") flock of geese blocks using your Print 1 and background fabric.
Block 16 Quilt


No comments:
Post a Comment