Showing posts with label scrapbook. Show all posts

Thursday, July 15, 2010

Ahh... the Potential

I finally got the scrapbooks I ordered online a couple weeks ago. It took me forever to find something that was the right size (20x20), a ring binder (no post-bound scrapbooks for me), that was something other than the same old boring three colors.

Behold... my beautiful new scrapbooks. Lavender, yellow, lime green, and wine red. Don't you just love the potential a new scrapbook holds? What will I put in this one? A theme, a single event, a year of my life? I know there is a huge debate about chronological scrapbooking, well, I'm one of those strange creatures. I must say, however, that I have one scrapbook devoted to the "outdoors"... my family's trip around Lake Superior one summer and my one week long canoe trip in Minnesota. I also have one dedicated to the early years of my husband's and my relationship.

However, I fully intend to use these to continue telling the story of my life. The red one is dedicated to becoming our wedding album. I'm currently working on scrapping the Civil Ceremony section of the saga. After our reception, I'll be adding those pictures as well.

The lavender one will probably end up being dedicated to my early childhood. I have the least amount of pictures of this part of my life (in part because my parents didn't take many and in part because they still have most of them and didn't feel like getting any more remade). So that album will probably span quite a few years.

I may devote the yellow one to our year and a half in Spain. Not the best time of my life, my dad's heart attack and all, but I do have quite a few pictures from that time.

I'm not sure about the green one yet. Maybe it will be devoted to my freshman and sophomore year of high school. My senior year takes up an entire album of its own (and is complete, I'm happy to say) and my junior year is resting in an album of its own (just tossed the pictures and accompanying items in a scrapbook, still need to actually scrap it). Another option is to use it for my college years. I actually didn't take a whole lot of pictures during college, except during my semester in Ireland, but that's already in an album of its own (and also complete).

So many projects, so little time. But that is part of the fun of being a chronological scrapbooker after all, you never can catch up. But that only makes sense. After all, I take new pictures all the time.

Sunday, April 4, 2010

Using Maps in your Layouts


I usually pick up brochures and/or maps when I go somewhere. I've used these in a variety of ways. Sometimes they are passive, showing the general layout of the area with my captions referencing back to items on the map or giving a more general idea of where the pictures were taken.

The picture on the left shows the map of the garden outside the National Botanical Garden in Washington, DC. I included it at the beginning of a whole series of pictures that I took in the garden. While the captions do not always reference back to items on the map, I've tried to include several wide shots of where we were in the garden, followed by close-ups of flower pictures. Then when I came to the pictures of the inside of the garden, I included another map of the building itself.


The picture on the right shows this map. I drew in the path we took through the garden. On another map, I actually numbered different rooms, and numbered sets of pictures later on to correspond back to the numbers on the map. In this case, I just drew in the path we took, and titled each page as the section of the building we were in.

This helps especially if you like journaling or just generally scrapbooking in chronological order. It helps to follow an "adventure" from start to finish. Or just give the person leafing through a better understanding of the layout.


Another way to use a map is to give a spatial sense of where something was located. In this case, I included a map of the University of Limmerick, where I spent my semester abroad. I wanted to show where my dorm was located in relation to my classes. I've used this technique with a map of Apalachicola, FL (a small town where we lived for a year). On one of the first pages of our "Florida" album, I included the full map of the (very small) city, and drew in big red dots for where our apartment was, where my hubby's work was, where my work was, and other places of note. Especially if they had corresponding pictures later in the album.

If you only have a few pictures from one location, you can use the map centrally and run string from the location on the map to the pictures around the outside of the map. I used this technique for my pictures of the Tower of London. I taped one side of the string to the part on the map it represented, and the other side I taped underneath the picture.

Do you tend to collect maps? How have you included them in scrapbooks?

Monday, March 29, 2010

Using your Scrapbook as a Journal

I found a great book about journaling as part of your scrapbooking experience a while ago. Now, this made a lot of sense to me, because I'd watched my mother write travel journal after travel journal. However, she then simply sticks them in the front of her albums and adds all the pictures behind the travel journal. I never liked that style of journaling, because it created such a divorce between text and pictures. Up until I saw the book on incorporating journaling into your scrapbooks, I scrapbooked mostly by using pictures and adding captions. But over time, I noticed that so many of the stories associated with the pictures got lost.

My usual method of journaling involves writing out the whole story in one long block of text (if I'm doing it on the computer) or writing a rough draft (if I'm going to be journaling by hand). Then I break that block of text down into smaller segments so as not to overwhelm any one page with a massive amount of text and add pictures as I go.

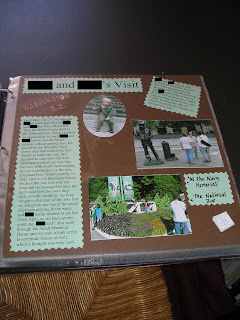
The page on the top left is done using a computer and printing out the text on one page with plenty of space in between the blocks for a nice edge finish. It is from a set of pages about my in-laws visiting us in DC. I broke the journal down into the separate days, and at the beginning of each "day" I put in my block of text. All of the text throughout is on the same color paper, to bind the story together, but that's certainly not a requirement. I find that journaling in this way helps me with my captioning, because I can refer back to a phrase in the text without having to worry about people being able to figure out the greater context of the picture.

The page on the right is from a trip I took to Boundary Waters in Minnesota. The trip leaders had us write about our experience while we there and sent us what we had written a few months later. I actually wrote out the whole story on cardstock and used it in place of regular journaling, since it captured exactly what was in my mind at the time of the trip. Again, I broke the text down into smaller chunks, and added one of the blocks of text every few pages. I also added the little notes that we wrote to each other at the end of the trip as an added reminder of the my adventure.

The actual text I had written during the trip, I added to the very back page of the scrapbook, using the letter I had received from my trip leaders as a sort of "envelope." To do this, I glued down both sides and across the bottom of the letter, and then about halfway down the page I added another line of glue to create a pocket for my pages.

This same method can be applied by keeping a travel journal and then using what you wrote during the trip as part of your scrapbooking layout.

Sunday, March 28, 2010

First Commission

Crafting is such a big part of my life, that some part of it is bound to end up in a scrapbook. In this case, I received a commission for a cross-stitch piece for a friend's after-school soccer program. I took pictures of the process, as well as several close-ups of different elements.

The page may seem a bit cluttered, but that's just the way I operate. I liked the idea of being able to see the progression from start to finish without having to continue on the next page. You can see, the big block of text on the left is the story about the commission and finishing the piece. I'll blog about journaling in your scrapbook in the next entry.

I think the hardest part about the commission was finding a good way to do the soccer ball, so I used the closeup of that on the page as well. All in all, I'm really satisfied with the way it turned out.

Thursday, March 25, 2010

Scrapbook- Tiled Layout

Tools: Scissors, Ruler, Pencil

Crafting Mats: Pictures, 12x12 Scrapbooking Pages, Mounting Squares

Instructions*: Determine how many pages you will need, by roughly laying out the pictures, and averaging 15 squares per 3.5x5 inch picture. Every 12x12 page will hold about 8x8 (64) 1-inch squares, with 1/4 inch allowance between pictures. Draw 1x1 inch squares on the back of the pictures to be tiled (I used pictures of flowers taken at American University) and cut them out, making sure to keep them in separate piles. With a pencil make dots along the edge of the paper about every 1 1/2 inches, and then make dots where these lines intersect. This will act as the middle point for each set of four tiles (if you look closely, you can see where my dots are, because I didn't feel like erasing them after I was done).


Arrange pictures any way you wish, making sure to keep at least two tiles of the same picture together for coherence. Stick on with mounting squares. If you would like to put a title in (like the one on my pages), leave several rows empty and explore any option you so choose. I went around campus and found different letters that spelled out "Campus in Bloom, Spring 2007" and then tried to crop them as much as possible so they would be roughly the same size when printed.


Alternatively, you could tile them on black paper to get more of a stained glass window effect, or cut out irregular patterns that fit together from picture to picture.

*Disclaimer: This is not my original idea, I saw this in a book on scrapbooking ideas and thought I would pass it on.

Sunday, March 21, 2010

Post Scrapbooks vs. Binders


I started out with 8x11 binders, but then moved up to 12x12 post scrapbooks, where you have to adjust the size and add pages in convoluted ways. So, recently I made the switch to binders and have been incredibly happy ever since. Not only do you not have to adjust the size, additional pages are simple to add, and you can just take a whole protective sleeve, or ten, out of one place and put it in another place or even move them to an entirely different binder. I also find the pages a lot easier to turn and find that they lie flatter. I believe the only downside might be, that layouts that take up two pages side-by-side are a lot farther apart, therefore giving you a bit of a different effect than they would if they were closer together. Anyone have any preferences?

Junk Journal

I have been passing an enjoyable day, waiting for DH to get home, perusing other people's crafting blogs. Sometimes they're a bit tricky to find, but I stumbled across a few great ones. I particularly enjoyed Enjoy the Ride's entry on junk journals. Which made me think. My first thought was, that's an awesome use for those ticket stubs, dove saying, fortune cookie slips, etc. that I hang onto with the intent of putting them into a scrapbook, but then losing, or not finding the right place for them, etc. So, I will be creating one of my own. My second thought was, I did something sort of like this, when DH and I first started going out. I kept everything, movie stubs, chocolate tops, even candy wrappers, from the times we'd shared together and made this hodge podge scrapbook that I nevertheless love looking through because it brings back so many happy memories. I thought I'd share a few pictures with you.


This was during my semester in Ireland, my first day of classes and my birthday both fell on Valentines Day, major homesick moment. Anyway, I kept all the letters, cards, everything that reminded me of him, or that he sent me while I was there.


I found some cool stickers with the months (now out of print, apparently) and just glued them down even when I didn't have any specific pictures to go with that month except a few words or ticket stubs. The whole Anna does..., DH does... continues into May.


I also divided the album up by seasons, as well as months. I used stickers, pictures, and any "junk" like ticket stubs I had laying around to tell a story of our first few years together. Maybe some day this will be a great thing to pull out for the kids.


A bit more traditional scrapbooking, but again I added random words and any stickers and embellishments that seemed to fit the mood or story.


I even kept airplane ticket stubs, tags from purchases and candy wrappers. I took a picture of the quilt I bought in Frankenmuth, printed out a map from World of Warcraft, and added interesting shapes to the background to bring certain elements together.

Saturday, March 20, 2010

Organization

Organization is the crafter's biggest asset, especially for scrapbookers. As discussed in my first post, I'm an incurable pack rat. I hoard away ticket stubs, programs, school projects, certificates, pictures, brochures, postcards, wrapping paper, stickers, itineraries, and various other odds and ends that I think might possibly come in handy for scrapbooking purposes. This is amazing when it comes time to scrapbook. However, I invariably end up missing something that I find again weeks over even years later, moaning about how it would have been perfect to fill that little empty space on the page.

My, rather inelegant, solution has been to dig through every single file and other possible hiding place for these little odds and ends before beginning to scrapbook. This usually works the best if I am focusing on a particular year, so I can pull everything from that year all at once and then match them to the pictures I have stored away. I have set places for all of my other materials as well. I have a box for all of my stickers, a divided box for my scrapbooking paper, all of my other supplies are carefully packed away into a single box in between uses (that includes my glue, my photo corners, my templates, scissors, calligraphy pens, etc.). My pictures are all in photo boxes unless they are ready to be used, sorted in a more or less chronological fashion and divided by box into College, Spain, Childhood, and other categories that seem appropriate.

My programs (with ticket stubs inside) and brochures take up one large drawer in the living room. My awards and certificates are stored in a hanging file folder, as are most of the other odds and ends. While I find this to be a great system for organization, in general, you can see where it might cause a problem when trying to pull together all of the stuff for a particular set of pictures. Either, I'll forget to look in the box of stickers, and end up going to the store and buying more, when I had already bought stickers specifically for that set of pictures. Or I'll forget about the folder of awards, and find one the next time I look through that would have been nice in a scrapbook I just completed. My usually response to this dilemma is to add anything important, like certificates and programs, to the end of the scrapbook it is associated with, so that it is at least with the other stuff. However, it still causes in inordinate amount of frustration.