Showing posts with label Finished Project. Show all posts

Friday, April 10, 2020

Quilt Finish 2018: Mini Diabolical Jane


Final Stats
Name: Mini Diabolical Jane
Dimensions: About 40" x 40" (I think)
Pieces: Front - 201, Back - 2
Pattern: Diabolical Jane by Jessie Aller
Technique: Patchwork
Materials: 100% quilting cottons
Quilting: Machine quilted on my Juki

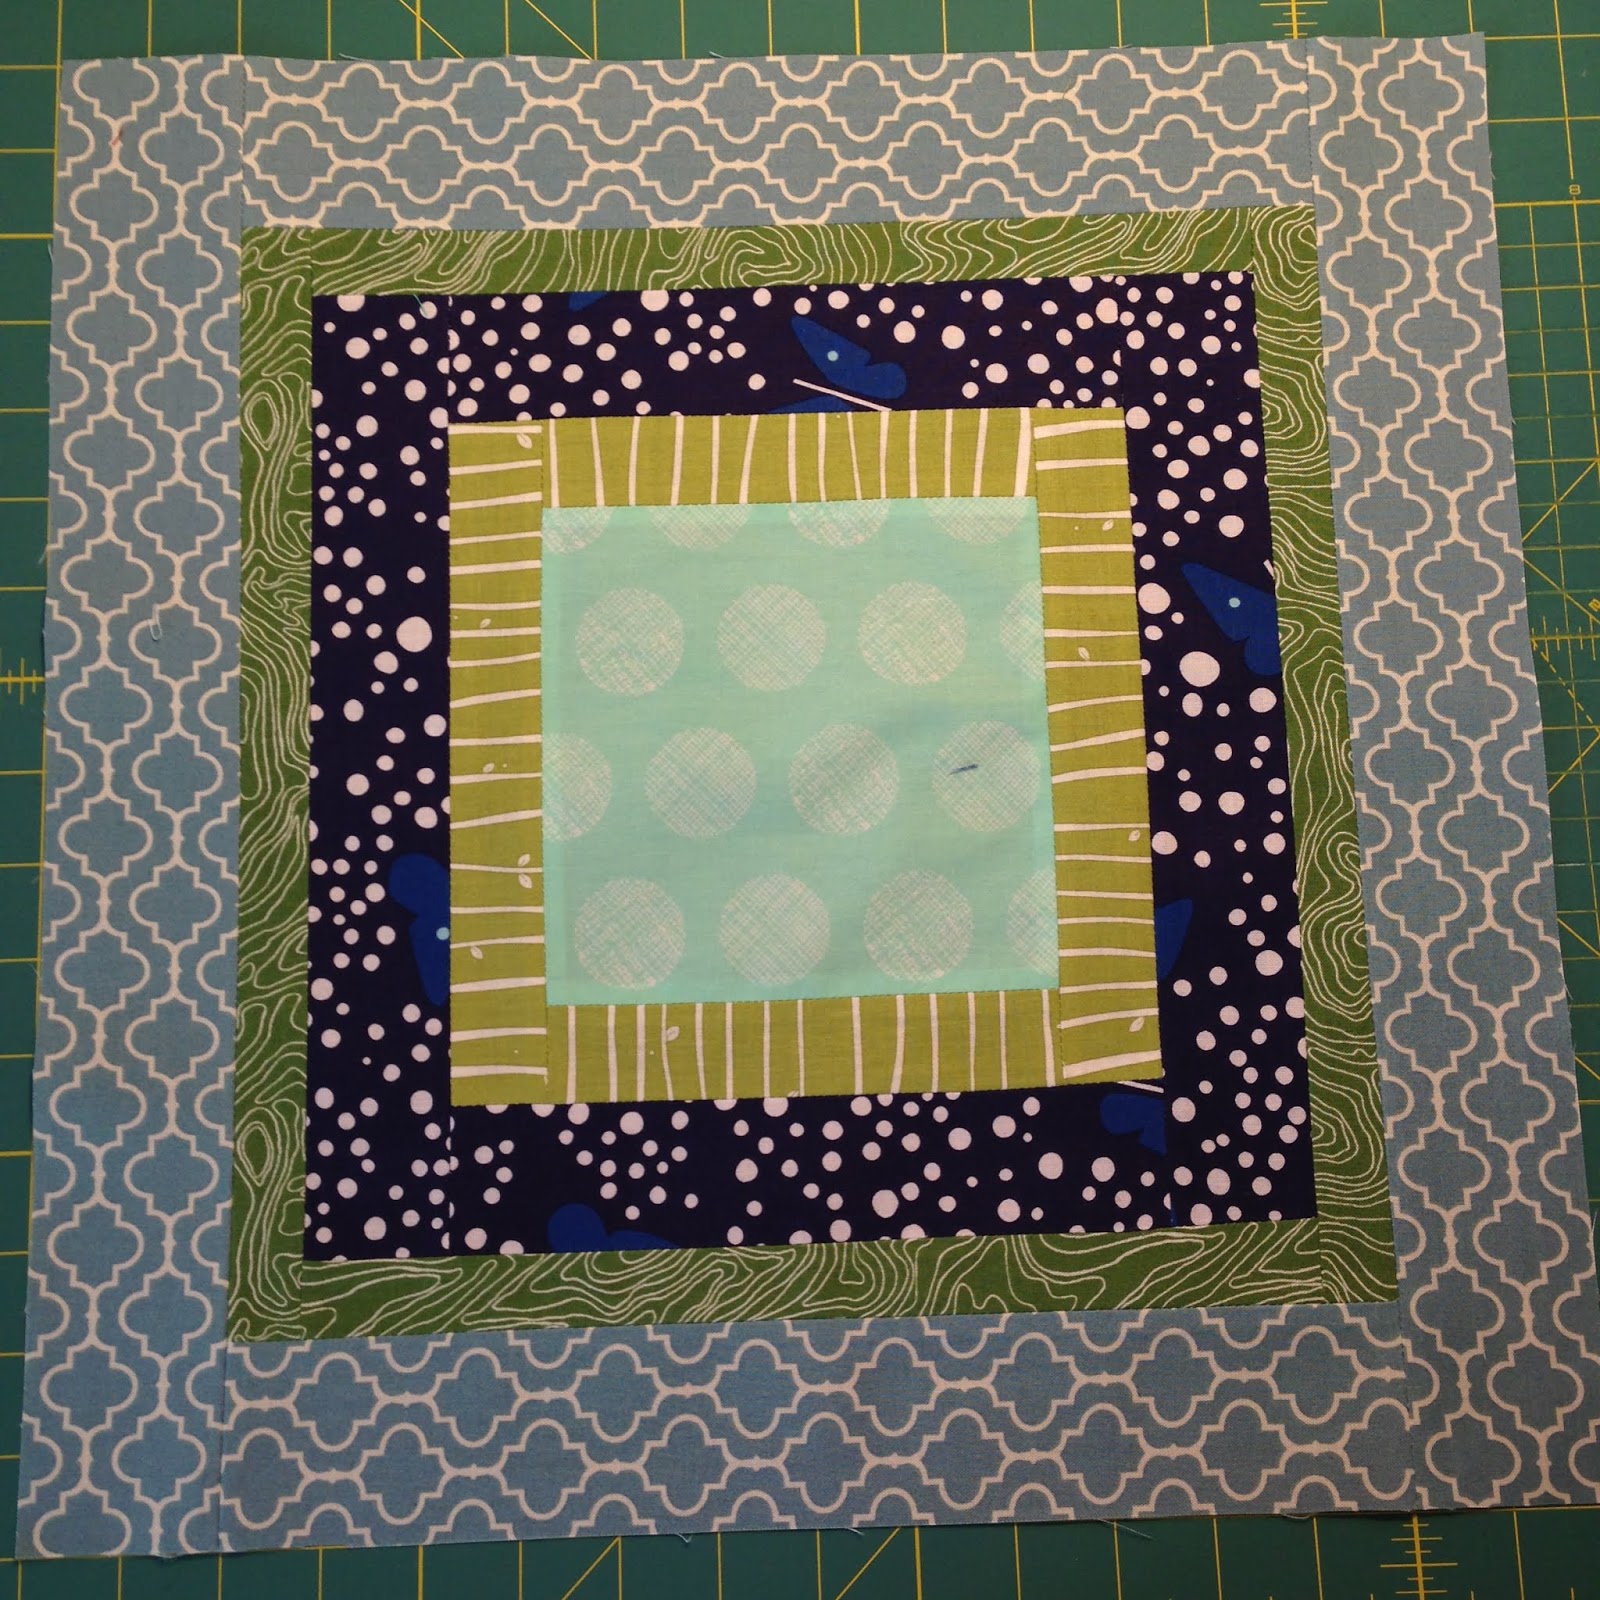
This story begins as many of my stories do, with an expectant mother of a little boy. I asked my usual question: theme and/or color of the nursery and she told me they were planning to decorate the nursery in blue and orange, with a Finding Nemo theme. I went back and forth with design ideas, including ones with fish and anything else nautical I could find. But after making my mother-in-law's sea life quilt years ago, I really didn't want to do anything like that again. And then I remembered that I'd been meaning to try out the Diabolical Jane pattern that a former guild mate of mine had posted on her blog. And the blue and orange would be great for that.

Plus with the layout of the colors fading to white on the edges it looked like a bubble to me. But first I had to adjust the king sized quilt pattern down to a baby quilt size, and I decide to cut my strips 2.5" wide and my diamonds 2.5" square. As you almost have to do with this quilt, I played with the layout of the strips quite a bit, before I was truly satisfied. I was not happy with those too dark blues at the outer edges, for example, so they got replaced or rearranged. A lot of the fabrics also brought in the nautical/fish theme, though I used anything and everything blue and orange I had in my stash, despite what was on them. Next I started sewing together the sections. The more I sewed, the smaller the quilt got. Which I know is kind of to be expected, but because of the number of pieces, it rather surprised me on this one more than on most.

For the back I had bought a fish print fabric and added a strip of a seashell fabric to one side to make it larger and that was it. Nothing fancy since the front is already quite busy. After basting it, it sat and sat and sat some more. The problem: my two commission quilts that I was bound and determined to finish before going back to any gift or personal quilts. And so it sat some more, basted, ready to be quilted, for almost a year. When I finally did get around to it, after quilting the African Commission #1 quilt, I chose to play up the bubble idea and did an all-over free-motion pebble design. I love quilting those, it's almost soothing, and on such a small quilt it takes hardly any time at all, nor is it very hard to manipulate through the machine. I quilted them fairly large as well and tried to stay fairly round with them, though I didn't succeed with that completely. I'd say it still turned out really nice. 

When I trimmed the quilt square, I was surprised by how much it shrank, but at that point it was way too late to add borders or anything else. The binding was a dark blue with a faint linear bubble pattern that I found while shopping for some of the other fabrics. It does a good job of framing the quilt so the edges don't fade out completely and still maintains the theme, which I liked. A quick embroidery to add my initials and the date onto the quilt, and I had another quilt ready to send back to Washington, DC. By then that baby was almost or maybe even over a year old. Whoops!

African Commission #2


Stats
Name: African Commission #2
Dimensions: About 60" x 60"
Pieces: Front - 281, Back - 4
Pattern: Chinese Lanterns
Technique: Patchwork, Applique
Materials: Hand-dyed batiks from Africa and Asia, Kona White
Quilting: hand-tied in two different colors of yarn

Same story as African Commission #1, which you can read about here. I convinced her that she should give me free reign on design for the second quilt. It was inspired by the center panel that she had purchased in Asia (I think China, but I don't recall exactly). The lanterns are based off of several Chinese lantern patterns I've seen online over the years. I put the rough dimensions I wanted into EQ7 and adjusted until I was happy with the overall effect. For the corner applique blocks, I was inspired by the center of the panel and created templates for the petals. I sorted out all the blue and white fabrics and used only those from what she had sent me. The lanterns are paper pieced, and I did roughly 2-3 from each of the fabrics. The fabrics that had some variety in the design were great, because they allowed me to use different parts of the fabric to create different lantern designs.

The corner blocks are rough-edge applique with thin iron-on interfacing and a straight-stitch to tack them down. I used paper templates to trace onto the iron-on interfacing, and then used that to cut my pieces out of the fabrics. The center is just a center that I cut to the size I wanted, framed it in a plain white border and then my lantern and corner blocks. I was really happy with how the top came out, I have to say. The back was just four pieces of leftover fabric, the tighter weaves, that I pieced together into something resembling a flat, squarish piece. The client and I had talked about doing a yarn-tied quilt for this one, because I was having a lot of trouble wrapping my brain around how to machine quilt this, especially with the big center panel. I didn't want to do anything that would detract from that stitching, and I usually quilt in white, so it would have shown very clearly on the dark blue background.

I ended up buying a doll needle, which is super long and when I asked the sales clerk, she just looked at me funny for a minute, until we went over where the needles are and there was in fact one called just that. My first attempt was to do the hidden stitching, but between the thickness of the appliqued blocks, the thickness of the yarn I was using, and several other issues, which all boiled down to it being supremely difficult to get the needle through the quilt sandwich, I finally gave up on that. So I did the double-loop with a knot on the back of the quilt, so the front would be flat and the quilting would be nearly hidden. To that end, I also used black and white yarn very strategically so it wouldn't show quite so much. I really liked the overall effect, but it was sooooo time consuming and really hard on my fingers even with bandages and all sorts of other things that I tried to make it easier to pull the needle through.

I really hope the quilting stands up to multiple washing, although the client indicated that she might use it as a wall hanging. In which case, it really doesn't matter. After trimming it to size, I just did an all white binding, so it would blend and let the rest of the quilt design shine. Usually I like darker bindings to put a frame around the finished quilt, but I really like the effect of invisible edges on this one. Some embroidery finished it off, and after my usual photo shoot, it went in a box and was sent to Washington, DC over a year later than anticipated. Luckily the client loved both quilts and seemed fine with the delay. I was pretty proud of myself for finishing it up as well, finally! Though I did promise myself no more commissions for a while, because it seriously depressed my sewing mojo for a long time. Having projects you have to complete that you're not incredibly passionate about is hard. Made harder when you guilt yourself into only working on that project until it's totally done. The result: nothing gets done. Lesson learned (maybe).


Thursday, August 30, 2018

African Commission #1


Stats
Name: African Commission #1
Dimensions: About 60" x 60"
Pieces: Front - 115, Back - 4
Pattern: Unknown
Technique: Patchwork
Materials: Hand-dyed batiks from Africa, Kona White
Quilting: free-motion on my Juki

So this all started with an email from the guild passing along a request from a woman in Washington, DC who wanted some quilts made from the fabrics she'd brought back with her from her business trips to Africa and China. I sent an email to the address listed and let her know up front what I charge for this kind of work (supplies, plus $20/hour for labor, plus 10% overhead/profit, with a $150 down payment for supplies), not expecting to hear from her again, because that's been my experience when people are looking for someone to make commission quilts. They just never respond or tell me that's crazy. Much to my surprise, I received an answer and she accepted the quoted amount. So I drafted up a contract, since this was my first commission for a non-family or friend, and we got it all signed. She also sent me the fabrics and I got started. First up, washing and drying to get the excess dyes and wax out and shrink the fabric. The washing really changed the feel of the fabrics, because they were very stiff before.

She wanted two quilts made and sent me some pictures of ideas. She was adamant about this pattern being one of the quilts, and unfortunately even after doing an internet search, I still don't know where the pattern came from. So if anyone knows, I'd love to give credit to whoever came up with the original. I would have had to resize regardless, so I drafted the pattern in EQ7, knowing I needed a lap size quilt, and with the intention of keeping the large rectangles as big as possible to show off the fabric to full advantage. I think I may have even measured those fans to see how big they needed to be to get the whole thing on there. I also wanted to make sure that every fabric she sent me was represented in the quilt, except for the panel she'd gotten from China.

I fussy cut, where possible and tried to get the non-blue fabrics over the blue ones, because I was planning a blue and white quilt for the second one (more on that in the next post). I used Kona White for the sashing, because I wanted the colors to really pop and there were too many dark fabrics to consider black as an option. I got the top put together fairly quickly, once all the cutting was done. I do wish I'd maybe interfaced one or two of the loosest fabrics, because they stretched a bit when trying to sew the lengths together, but otherwise the fabrics held up pretty well. I kept updating her with pictures and got her go-ahead on the quilting pattern I wanted to use. My go-to for square quilts: free-motion boxes. Which I think turned out really well and only took me two or three hours. I bound it in the dark brown fabric that she had provided, because it gave the most contrast and also had the best hand for cutting into thinner strips.

It only took me about a year longer than initially agreed upon to get these quilts done for a variety of reasons, but luckily I had a very understanding client. She just wanted the quilts and loved the end result. This was my first quilt finish in 2018, but was quickly followed by numbers two through six. I'd more or less had quilter's block that entire year, plus an infant, moving, watching kids full time and so on. I'm really happy it's done, it's beautiful, and I got paid for it. Not that I want to do a ton of commissions, but every once in a while getting paid to do what I love, as long as it's fair compensation in my book and not a low-ball offer, is nice. So here you go, the first of the two commission quilts. Second one to follow soon.

Thursday, August 2, 2018

Modified Bento Box Lap Quilt


Stats
Name: Modified Bento Box Lap Quilt
Dimensions: Around 68" x 68"
Pieces: Front - 425, Back - 17
Pattern: Modified Bento Box by Film in the Fridge (http://filminthefridge.com/2009/06/24/quartered-squares-a-modified-bento-box-block-tutorial)
Technique: Patchwork
Materials: 100% quilting cottons
Quilting: Free motion on my Juki and my sister's Singer

So my mom told me she wanted a quilt (a while ago). Said she didn't care when she got it, but she wanted one. As I was at least willing to entertain the notion, I asked her what colors: blue and green. I even sat down and showed her some pictures of fabrics in my stash and we came to the conclusion that she didn't want any fabrics with people, animals, or buildings on them. Primarily geometric with some butterflies and seashells mixed in. I had been wanting to give Film in the Fridge's Modified Bento Box tutorial a try for some time, ever since I had to make a block for someone in a bee, and decided that this might be the perfect opportunity. I was participating in the Stash Bee at the time (2014), so I wrote up a block tutorial based on Film in the Fridge's original. I don't remember, but I feel like I also asked for the same block from another bee, but it's been a while and I honestly don't remember.

Then the blocks sat and sat and sat, because I knew I wanted the quilt to be a decent size and I was missing a few blocks. Plus I had other quilts I wanted to get done. But I finally got my butt in gear, figured out how many blocks I still needed, did a quick fabric pull, and then chain pieced those suckers. The blocks are supposed to finish at 16" square, and I had deliberately asked people to leave them at whatever size they finished, so I could make decisions on final size later. Since some of the bee blocks turned out a bit crooked, when I cut them into quarters, I ended up with some warped edges. Which is why I decided to cut down the center as well, so I'd have consistent center sizes and at least one matching seam per block. Thank goodness for a sewing day with a fellow quilter, or that process may have gotten overwhelming. I believe I ended up somewhere in the range of a 14" block or so, after cutting down and reassembling. 

The only thing I really cared about was that the same fabric didn't end up next to each other, which wasn't a huge problem, because only a few of the blocks were made by the same people and had the same fabrics repeated. And then it took a while for me to arrange the blocks on my design wall to my satisfaction so the quarters weren't too close to each other. I did the arranging and sewed the top together during one of the trips my husband took with our son, when I was home alone and didn't have to worry about the little monster angel pulling blocks off my design wall. Then the quilt sat again, because I didn't have a back for it.

Enter one of our quilting retreats for the DC Modern Quilt Guild. I brought the fabrics I had bought, scaled up the modified bento box pattern to 70" squared and pieced the back (I'm rather proud of that one, tyvm). It took some piecing of strips, because I didn't have long enough lengths, and also some piecing due to cutting mistakes, but I really like the final result. I think I basted it at the retreat as well, but I don't remember, and maybe even started quilting it with the box free motion quilting pattern that I really enjoy. Then it sat again. And sat. I was trying to focus on my commission quilts, but they were just giving me quilters block. So on one of our trips to Michigan in 2017, I decided to bring this quilt with, plus the binding fabric, and see if I could finish it.

What I didn't bring... my beautiful Juki work horse. I figured I'd be able to use my mom's (old, solid) Singer or Pfaff, but neither had a free motion quilting foot. So I ended up borrowing my sister's small (cheap, plastic) Singer. It got the job done, but boy what a difference in quality of stitching and shakiness of the box sides. I also got the binding made and attached, though I forgot to embroider my initials and the date, because I figured I would see it again at some point. I got it done the day before or the day we were supposed to drive back home to Maryland, so ended up doing a quick photo shoot with my mom and my hubby of the final quilt. I'm quite happy with how it turned out. And recently it finally saw some use, after sitting folded at the end of my parents' bed, when I used it to cover up my sick son (which also meant it's first wash afterwards, which left it nicely crinkled). I think I like it so much because blue and green is my favorite color combo as well, and what I chose for my son's room. So I'm seeing another blue and green quilt in my future for his big boy bed at some point.

Monday, July 9, 2018

Travel Charity Quilt


Final Stats
Name: Travel Charity Quilt
Dimensions: 40" x 40"
Pieces: Front - 225
Pattern: 8" Economy Blocks
Technique: Foundation paper piecing
Materials: 100% Quilting Cottons
Quilting: Free motion quilting on my Juki

This quilt started out with a pack of fabric from our charity quilt stash for my guild's 100 Quilts for Kids event. I decided to focus on the travel theme and pulled some additional fabrics from my stash for the centers and some additional green, blue, and black for the frames. I decided on economy blocks to take advantage of the fabrics and I knew the quilt only needed to be 40 by 40 inches to donate. So that meant 25 8" blocks total. I finished the front during one of my guild's sewing retreats and did the quilting at our next sewing meeting. The quilting has loops and words like "flying" and "driving" randomly placed. I bound the quilt in a grey stripe. I'm really happy with how it turned out. It was also my first quilt that I donated to charity as a finished product, which made me feel pretty good.


Thursday, April 5, 2018

Diver Lap Quilt


Final Stats
Name: Diver Lap Quilt
Dimensions: 50" x 70"
Pieces: Front - 44
Pattern: applique pattern based off clip art found online
Technique: Patchwork, applique
Materials: 100% Quilting Cottons
Quilting: Machine quilted on my Juki


So this started, like too many of my quilts, with a friend who told me she had a fairly serious health issue. She was a professional diver in a former life before I met her at work. And oddly enough, I found out at roughly the same time as I found out about my other friend's health issue. And both of them told me that purple and blue were their favorite colors. So during one of the 2016 DCMQG's retreats, I decided to bring the printed applique pattern that I had created, and a stack of solids in purple and blue. You would not believe how long I had to search to find what I was looking for in terms of the steps to a dive (I believe this is a pike position). Once I finally found something, I blew it up to about 30 inches by 70 inches in Adobe InDesign and printed it out.


I started the second day of retreat and cut 10 inch squares from the purple and blue fabrics and arranged them to my liking. Sewed the background. Then used light iron on interfacing to transfer the divers onto my pink and yellow fabrics and then ironed them onto the top. I basted the quilt sandwich using a 120" backing fabric and then quilted it using kind of an elongated meander that reminded me of waves.


Finally I trimmed and bound it, all before heading home for the weekend. In fact, I may have even finished it in one day. It's been a while though, so I can't remember for sure. I even managed to embroider my initials and year into the corner. As soon as I got home, I stuck it in the wash, and presented it to my friend at work the next day. She approved and told me that the positions of the dive were spot on. So yay for me. :)

Thursday, July 13, 2017

Granny Square Banner Quilt

 
Final Stats
Name: Granny Square Banner Quilt
Dimensions: 84" x 84"
Pieces: Front - 441
Pattern: Variation on the Banner Plus Block 
Technique: Patchwork
Materials: 100% Quilting Cottons
Quilting: Machine quilted on my Juki
 
So this quilt started out as part of my DCMQG 2016 QAL (which will get finished at some point, when I'm not wrangling a newborn). I loved this particular variation on Block 7 so much, that I wanted to turn it into a quilt. So when one of my best friends, and college room mate, told me she'd gotten some bad news about her health, I decided to make a quilt for her to cheer her up and wrap her in some love, like quilters tend to do. I asked her what her favorite colors were, and the answer was blue and purple. So I pulled every fabric scrap I had in those colors, plus my low volumes, and proceeded to bang out 9 28" blocks, while my hubby and son were visiting family in Michigan.
 
The very center square is black and all the other center squares are a dark blue. I guess there's supposed to be some symbolism there about coming out of darkness and what not. I spent some time arranging the various pieces to my satisfaction and then also spent some time moving around the finished blocks. I had bought a bunch of purple backing, because I was making this quilt and another quilt (post coming soon), and both were blue and purple. And because I was trying to finish this quilt rather quickly, I also just wanted something easy. For the quilting, I did a free motion box-in-box pattern, which is more "boxy" in parts than in others. The benefits of the pattern are that its fast and I don't really have to worry about accidentally running over already quilted portions, because I just turn it into yet another box.
 
For the binding I used some of the leftover blue bike path fabric from Eric's Pixel Michigan quilt. I machine bound it, because well, it's faster and I hate hand binding. Generally by the time I get to the binding, I just want to be done already and get the quilt out of my house (or on my bed). One load of laundry and lots of Shout color catchers later, and I had a finished, folded quilt to gift to my friend. All told, this quilt took me just under two weeks. I finished it right before my guild's March 2016 quilting retreat.


Saturday, June 24, 2017

Space Baby Quilt

 
Final Stats
Name: Space Quilt
Dimensions: 40" x 60"
Pieces: Front - so many
Pattern: Various 
Technique: Patchwork, paper piecing
Materials: 100% Quilting Cottons
Quilting: Machine quilted on my Juki 

So the couple whom I made my second ever quilt for, the Circles Quilt, had a second kid and I wanted to make their son a quilt as well. As per usual, I asked my question about nursery themes and colors. Then the wheels started turning and I found this great paper piecing rocket pattern. I also found an amazing new (at the time) fabric line, Night Sky by Robert Kaufman, and took my color inspiration for the stars from one of the fabrics in the line that I ended up buying for the backing of the quilt. I also bought the more neutral black stars fabric for the background on the front.
I started looking for various star patterns and found some paper piecing patterns and also just dove in and made a few up as I went along (the wonky star, the QST star, and the star with the flying geese blocks, for example). I honestly don't remember where I found all of them, and I apologize for that. I do know that the Basketweave Star that I'd used for my Red, White and Blue Star Quilt was one.
I decided to stick to mostly monochromatic stars using the colors from the constellation fabric: green, blue, yellow, orange, and red. I only deviated from that with one of the stars and that was to make sure it had enough contrast to really make the pattern shine through. Once I had what I decided was enough stars, I spent quite a while deciding on the best placement for everything. Then I started filling in the background to make all of the blocks 12" square. And in between squares, I added 2.5" sashing to give everything a bit of breathing room.
I free motion quilted it with my favorite star pattern. It seemed rather appropriate. And I managed to finish the quilt just in time for our friends to come to DC with their two kids and have dinner with us.

Sunday, January 10, 2016

Braille Alphabet Quilt


Final Stats
Name: Braille Alphabet Quilt
Dimensions: 42" x 51"
Pieces: Front - 238
Pattern: Thomas Knauer's Braille Alphabet Quilt with some very minor modifications 
Technique: Patchwork
Materials: 100% Quilting Cottons - Kona Ash and various prints
Quilting: Machine quilted on my EuroPro

Started with my usual, asking the expecting mother-to-be, one of my friends and coworkers, what the theme of the nursery would be. This is her second, so she said she'd be reusing her first son's alphabet stuff and grey. Great, except I didn't want to do the standard alphabet thing. A quick internet search later brought up Thomas Knauer's Braille Alphabet Quilt-Along and although he hadn't finished the posts at the time, I figured out the pattern and decided on the size of each square based on the fact that I'm lazy and didn't want to piece the back. So I wanted to keep the front under 44" across. That's how I ended up with 3.5" squares, which ends at roughly 42" wide. I found the backing fabric first and then grabbed two fabrics for each color for the front. I cut up the rest of my Kona Ash for the background.

I laid out the background squares first. The braille alphabet works by having six dots in a 2x3 grid, where some will be raised to indicate the letter. So A has a single raised dot in the upper left section, B has a two raised dots in the upper left and the middle left sections, etc. Applying this to the quilt, each "block" is a 2x3 patchwork where the background squares are the smooth sections and the prints are the raised dots. Seems completely random when you first look at it, but when you know what you're looking at, it makes so much more sense. Thus I got a non-obvious ABC theme. After laying out the background squares I then filled in the prints, trying not to get the same color or the same print right next to each other, although I had to put some of them kiddie-corner to each other in the lower portion where the "dots" became more frequent.

I finished the top of the quilt before I gave birth to my own son in February and then it sat there for a long time. I finally managed to get it basted and then it sat for another long time. In the meantime my friend had had her son, shortly after I had mine. I took it to the DCMQG quilt retreat in November with the intent to finish this quilt, even if I did nothing else (actually it was my second step after finishing my bee blocks). My friend had plans to come to DC for our work all-staff meeting and holiday party, so I wanted to have it done to give to her in person. And I made it. Got it quilted with the cursive uppercase and lowercase ABCs in the corresponding braille letter blocks, and some sort of fun design in the couple "spacer" blocks (I think I did a leaf, a star, a heart, and a swirl). And I got it bound as well. The only problem was that I a) forgot to embroider my initials and the year in the lower right corner like I usually do and b) forgot to take any decent pictures. The only picture I have of the completed quilt is the fuzzy one of me holding it up.

I may have to ask my friend to take a few pictures and send them to me. I really did enjoy giving it to her in person though. Just in case you're wondering, I finished the last of my bee blocks too. :)

Thursday, November 12, 2015

Modern Birches Baby Quilt


Final Stats
Name: Modern Birches Baby Quilt
Dimensions: 48" x 60"
Pieces: Front - too many scraps to count
Pattern: My own, based on Bright Birch Trees by Amanda Jean Nyberg (Crazy Mom Quilts) and Night Forest by Jacquie Gering (Tallgrass Prairie Studio)
Technique: Improv, slice-and-insert
Materials: 100% Quilting Cottons - Bella Solids and many prints
Quilting: Machine quilted on my EuroPro
 
So this is the second nephew this year, so I once again went on a fact finding mission. First: figure out the nursery theme. Neutrals with a vague nature theme... check. Second: Gather inspiration images from the interwebs. I found quite a few options with vague tree themes and I gathered them into my project folder. Since this was for my sister-in-law and my brother, and they knew full well that they would be getting a quilt, I ran my inspiration images by my sister-in-law to make sure I was on the right track. She liked the modern interpretation of birch trees the best, which was good, because that's what I was heavily leaning towards. I was also working on a cross-stitch sampler and wanted to take color inspiration from that: Forest by SatsumaStreet.

As luck would have it, I had signed up for a bee through the DC Modern Quilt Guild, and for my month I asked the gals to help me make blocks for the quilt. Backgrounds were to be solids on the spectrum from white to dark grey. I had purchased some Bella Solids in white, cream, light grey, and dark grey. I also specified teal, purple, orange, red, and yellow as the prints with a punch of black in each "tree trunk." They came through for me in spectacular fashion and I was able to fill in blocks for each color.

I ended up with six bee blocks and made another 14 myself. The hardest part was figuring out a layout that would work for my OCD. I had roughly four different colored backgrounds: white, cream, light grey, and dark grey. I had five different colors: teal, purple, red, orange, and yellow. And I had three numbers of tree trunks: three, four, and five. I took pictures and plugged them into EQ7 and played around with the program until I had something I liked. I didn't really consider the number of tree trunks, but I didn't want background color or trunk colors touching except diagonally. I popped the blocks up on my new design wall and rearranged a little more and once I was satisfied I sewed the top together.

For the back, I made one large "birch trunk" using the solids to insert into the print background, so a reverse of the front. Except in one of the trunk sections I inserted several strips of prints more reminiscent of the front. I love the overall effect. I decided to try out a leaf free motion quilting design, because I'm still new to FMQ and wanted a design that would cover up sudden jerks where I stop and start. Things with points are really good at that, like stars and leaves. I also hid a secret message from "Aunt Anna" in the quilting. Overall I was quite happy with how the quilting turned out.

For the binding I'd found a pale grey stripe, which I cut across the stripe as per usual. I do love me a stripey binding. I definitely went a little overboard and made WAY too much. I decided to machine bind the quilt, because I feel like that makes it more secure, especially on a baby quilt that will get washed a lot. I was even able to do a fun photo shoot when we went to Michigan for my brother-in-law's wedding, as we stayed in a cabin that was surrounded by birch trees. Then I was able to hand-deliver the quilt and meet my new nephew. 


A few more photos from my photoshoot: