Showing posts with label charity. Show all posts

Thursday, January 11, 2024

Charity Block 4 for GRMQ (Jan 2024)

Adding another charity block option to our repertoire...

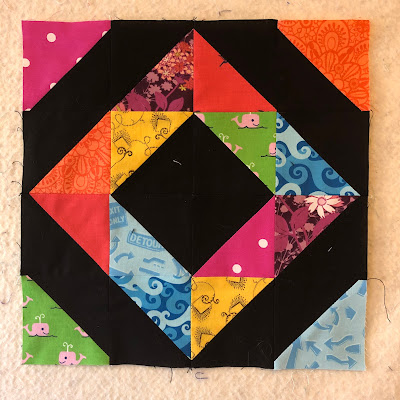
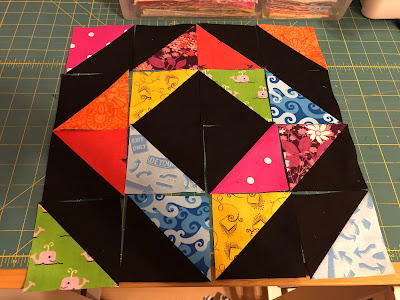
Here we have a riff on 9 patches with one focus square:


Note: This block works best if made as a leader-ender project while sewing other things. It's also nice to have a wide range of scraps for this, so I just cut squares as I'm cutting fabric for other projects and chuck them into my pile. I do the same with the 2.5" checkerboard squares as well. I also use leftover HSTs and QSTs from other projects as focus squares, for example if a project calls for an odd number of HSTs, I'll cut down the remaining HST to a 3.5" square.

Fabrics: any color, any motif (try to stay away from anything alcohol related and anything violent/weapons, etc.)

Cutting Directions:

8x 3.5" squares

For the Focus Square:

HST: 2x 4.5" squares (for the 2-in-1 method, and then cut down to 2x 3.5" squares)

Rectangles: 2x 2"x3.5"

9-Patch: 9x 1.5" squares

4-Patch: 4x 2" squares

QST: 2x 5" squares (will make 2x 3.5" squares)

Instructions:

Put together your focus square and make sure it finishes at 3.5". You can also use just about any other type of block as long as it ends at 3.5" square. For example, an improv block, a star block, whatever it is, have fun with it.

Now sew together the 9-patch, making sure to vary where your focus square ends up. If you make several of these at a time, which I usually do, I will sew some focus squares into the top row, some into the center row, and some into the bottom row, and also vary which column they end up in. Also try not to have the same color family touching in the block (i.e. don't put two dark blues next to each other, or two reds, etc.).

Blocks should finish at 9.5" square. Happy Sewing!

Thursday, January 6, 2022

Charity Block 3 for GRMQ (Jan 2022)

 And finally, we've got block #3, the improv block. Really what I'm looking for is a piece of one color that we can cut at least a 5" square from (bigger is good too, if it's really big, we might even be able to cut multiple squares from it, so you can really make it any size you'd like).

What you will need:

Choose one color (not white/cream or black) and pull out all of your random sized scraps of that color (if you don't have a scrap stash, you can pull out fabrics and cut random pieces with scissors or a rotary cutter)

They do not have to be ironed or even rectangular. They can be cut offs from previous projects. As long as they're in that color you chose. Mostly prints, but you can throw in some solids as well.

For improv piecing, just throw out the rule book. No precision cutting (I don't even use a rule and rotary cutter most of the time, just my fabric scissors), seams can be as wide as you'd like, as long as they're at least a scant quarter inch. You can do curved piecing. Iron pieces flat by warping the fabric, if you have to. You can even flip fabric around to the other side, if the front is too bright and you want to use the more muted side. The only rules I follow are that two pieces of the same fabric can't touch and that pieces can't be too big. That's it!

I generally start by just grabbing two pieces of fabric and deciding which side to line them up on, and then sewing about a quarter inch seam along a roughly straight line. Once I have a nice little pile, I go and iron them all. You can also build strips without ironing in between, as long as you're not going to go over one of the existing seams. I highly recommend pressing open on these to eliminate bulk in the seams, there will be no seams to butt up or perfect points.

Here's my pile of pieces, roughly in pairs of two. There's some triangle shapes and lots of rectangular shapes. Then just keep building onto those. At some point you can start adding larger pieces to each other.


Don't be afraid to cut your pieces apart if you want to, before reassembling them. 


Also, when putting two pieces together that both have uneven edges, it's good to use your scissors or rotary cutter and ruler to create a straight line on one edge of one of the pieces so you have a line to sew along. Also make sure you trim off any overlaps with your scissors.


Trim the overlap with your scissors using the straight line as a guide.


And don't be afraid to use pieced scraps from previous projects to incorporate into this. The picture above shows me putting the striped piece onto a row of already pieced scraps from another project. 

I decided to stop once I had the three pieces (each one was large enough to cut at least a 5" square from), but you can keep building your sheet as large as you'd like. If I'd had more time last night, I probably would have made another "quadrant" and then pieced them all together somehow.

Do NOT trim these down. Leave them as they are. Making these three pieces took me probably half an hour and again this is a great project to do in little chunks between working on other things. Also a great scrap buster for those weird shapes and thin strips you've been hoarding (you'll get no judgement from me, I do it too). 

While this is for my current guild, the Grand Rapids Modern Quilters, anyone can make these blocks and contribute them to our charity quilts (or just make them for yourself). If you'd like to contribute them, email me and I'll give you my address to send them to (DamascSt@gmail.com). If you're in the guild, we'll have a box at every meeting that you can put your finished (or partial) blocks in, or you can drop them off with me or Cindy.

Charity Block 2 for GRMQ (Jan 2022)

So here is block #2, the HST Diamond block:

You will need for each block:

8x 4" square black background pieces - all the same (can have a small amount of pattern on it, but should read as black)

8x 4" square patterned scrappy pieces - all different (make sure they aren't too dark so they'll show up against the black)

For the ultimate scrappiness, I would recommend making two blocks at a time (so you'll need 16 of each instead of 8), since we'll be making two-at-a-time HSTs. That way you can put one of each fabric in each block.

You can use squares larger than 4" as well, just make sure to line up the corner that you're drawing your line through, so you're not trying to guess if the squares are lining up. Example below, you'll want to draw your line from the top left corner to the bottom right, so it goes through the corner that you lined your fabric up on.

Since you're using black fabric, you'll have to draw your line on the lighter side.

Sew a quarter inch on both sides of the center line, then cut the fabric down the line. Iron (I suggest ironing open to limit bulk in the seams) and then trim each block to 3.5" square.

Lay out your blocks so there is a black diamond in the center and colorful corners on the outside. It helps to take a picture at this point, so you have a reference for how you laid your block out.

Sew pairs together using a scant quarter inch seam, lay it out again. Sew pairs into quadrants using a scant quarter inch seam (I pinned at the seams).

Sew quadrants into halves using a scant quarter inch seam, and then the halves into the finished block. The finished block will end up at 12.5" square.

This block takes a little longer than the last one, because of the trimming and such, but overall not a hard block to make.

While this is for my current guild, the Grand Rapids Modern Quilters, anyone can make these blocks and contribute them to our charity quilts (or just make them for yourself). If you'd like to contribute them, email me and I'll give you my address to send them to (DamascSt@gmail.com). If you're in the guild, we'll have a box at every meeting that you can put your finished (or partial) blocks in, or you can drop them off with me or Cindy.

Wednesday, January 5, 2022

Charity Block 1 for GRMQ (Jan 2022)

I've been making these blocks forever. Whenever I have scraps, I cut them down into squares, rectangles, or leave them as is and stick them in my scrap baskets. All of the charity blocks this month will use up these scraps.

First up, the checkerboard blocks:


What you will need:

2.5" square pieces of low volume (if you take a B/W picture, the fabrics should show as white) - solid whites and creams are the best, but you can use some patterns too, just try to limit patterns with a bunch of additional colors or more noticeable patterns

2.5" square pieces of medium to high volume - patterns are best, but you can also use some solids

In the top picture, I set aside the top three fabrics, because I wasn't sure if they'd work as low volume. When I took the bottom B/W picture the outer two showed as white so they went in my low volume stack, the middle showed as a light grey. These blocks look best with mostly white on white or with solid white/cream as the background.

Pair one med/high volume with one low volume piece. Sew a scant quarter inch seam. It should now measure 2.5" by 4.5". Then pair your pairs together into quadrants (try not to use two med/high volume pieces of the same color in one quadrant). If you have directional prints in your pairs, make sure that you orient them so a med/high volume square is in the bottom left. I iron my seams open, so I like to stick a pin where the two seams meet up. If you're ironing to the side, you can probably skip that and just butt the seams together as you sew. Sew a scant quarter inch seam. Your block should now measure 4.5" by 4.5".


Now pair two quadrants together into a half. Pin at the seams and sew a scant quarter inch. Your block will be 4.5" by 8.5". If you have directional prints, make sure you continue to keep a med/high volume square in the bottom left corner.


Finally, pair the two halves together. Pin at the seams and sew a scant quarter inch seam. Your block will be 8.5" by 8.5". Once again, if using any directional prints, keep the med/high volume square in the bottom left.


It took me less than 30 minutes to make 2.75 blocks (it might take a bit longer if you have to cut fabrics first). Make as many as you'd like, if you have extra pairs, quarters, or halves, save them and make a few more here and there as you sew other things.


While this is for my current guild, the Grand Rapids Modern Quilters, anyone can make these blocks and contribute them to our charity quilts (or just make them for yourself). If you'd like to contribute them, email me and I'll give you my address to send them to (DamascSt@gmail.com). If you're in the guild, we'll have a box at every meeting that you can put your finished (or partial) blocks in, or you can drop them off with me or Cindy.

Monday, July 9, 2018

Travel Charity Quilt


Final Stats
Name: Travel Charity Quilt
Dimensions: 40" x 40"
Pieces: Front - 225
Pattern: 8" Economy Blocks
Technique: Foundation paper piecing
Materials: 100% Quilting Cottons
Quilting: Free motion quilting on my Juki

This quilt started out with a pack of fabric from our charity quilt stash for my guild's 100 Quilts for Kids event. I decided to focus on the travel theme and pulled some additional fabrics from my stash for the centers and some additional green, blue, and black for the frames. I decided on economy blocks to take advantage of the fabrics and I knew the quilt only needed to be 40 by 40 inches to donate. So that meant 25 8" blocks total. I finished the front during one of my guild's sewing retreats and did the quilting at our next sewing meeting. The quilting has loops and words like "flying" and "driving" randomly placed. I bound the quilt in a grey stripe. I'm really happy with how it turned out. It was also my first quilt that I donated to charity as a finished product, which made me feel pretty good.


Thursday, April 18, 2013

WIPs

I started making myself a to do list in Word. It started to feel like I should just copy and paste the same list over and over because I have so many quilts on my list that I am just starting.

So, here is my current list and a few pictures where I feel I can share them.

Two wedding quilts. One of them I can't share, because it's a complete surprise.

The other is a yellow, gray, and coral Plus Quilt for my brother and future SIL. It's sort of a surprise, but not much of one, since I very heavily hinted like that may be happening when I asked my FSIL what colors she likes.
I started cutting the gray fabrics, before I really thought about the process. I have since backtracked to cutting one long stretch for the cross-bar and two squares for the top and bottom of the Plus. I am using two 5.5" squares and one 5.5" x 15.5" strips. I have cut all of the fabrics shown above already, and am waiting on quite a few more to come in. This will be my first king sized quilt, and I'm a little freaked out about it. Maybe I'll change my mind and make it smaller.

There is another quilt I'm making out of batiks, but everything about that quilt is a surprise. No special occasion either, just because the recipient is awesome. I am still trying to figure out which pattern to use, since it has one fabric that I want to showcase. I think I've finally settled on two possibilities.

Then there is my Japanese X and + Quilt that I am making for myself. Finally!
I have cut most of the lighter text prints into 5.5" squares. I need 56 fabrics worth, and I think I have cut 52. I have two more light text print waiting to be cut, and then I need to decide if I want to purchase a couple more or just use some of the other stuff I have. As you can see, I have a variety of things in with the text, including musical notes, keys, and mustaches. I have one butterfly fabric with a cream background that I'm considering including as well. It's basically just the fabrics that make me happy. These will become the X portions of the X and + Blocks.
I am using Kona Rich Red as the points on the X blocks. Here they are pinned onto my mustache print. 
Here the points are sewn on and ironed flat. I will be using four different text prints for each block, but the blocks will line up in such a way that the four text prints will touch. Hard to explain right now, but I'll show you once I have a few blocks done.

As I am cutting fabrics, I am also cutting 2.5" strips for a Scrappy Trip Along quilt. Right now I don't have nearly enough variety to start making any blocks (light text prints, some greys, yellows, and corals mainly), but I'll keep cutting away.

I also have my charity quilt to finish, I need to put together, make the backing, and quilt the Hurricane Sandy quilt, and then get in touch with the organizer and let her know that I just received the last of my blocks and should I still send it to the Sandy charity or pick another charity instead.

As for my UFO's, I have the Star Wars baby quilt, the Split Rail Fence quilt, and the placemats sitting around looking at me longingly.

I also need to update my WIP and Completed Pages. I'm thinking about giving them a make-over at some point, but that will have to wait.

Wednesday, December 19, 2012

Bees and Charity Quilts Galore

I was updating my Works in Progress page and realized that I have a lot of stuff going on next year.

I'm now signed up for quite a few Bees:

Add-A-Border Block Swap - which moves at whatever pace you feel comfortable. I have made several starter blocks and am actively working on one Round 2 block (it's slow, my first paper piecing pattern, so I don't want to screw it up) and have several Round 2 blocks sitting and waiting for something to happen.

Color Bee Shocked - my month as Queen Bee was in November, but it's a one year commitment with at least one block a month. I have completed the December flying geese blocks which were a lot of fun and the fabric for the January Bento Boxes is sitting on my desk

3x6 Mini Bee - I finished the first round's worth of blocks for Quarter 4 and you can hop in and out of this Bee as your schedule requires. I am hoping to sign up for 2013 Quarter 1 and have even been thinking about leading one of the groups. Each quarter is a 6 Block/2.5 month commitment, but once you're done making your blocks and have sent them off, it's just a matter of waiting for everyone else's to arrive.

HOPE at do.good Stitches - I was just accepted into the HOPE circle for do.good Stitches. This is a 1-year/2 blocks a month commitment starting in January. It's a great cause and will let me play around with the fabrics I'm slowly accumulating.

Bitty Block Committee - I logged onto Flickr today to find a message waiting for me. I had requested to join the Bitty Block Committee and after being judged by my peers I was deemed acceptable. How cool is that! This one is great because you can jump in and out at any point for a 1-month commitment. They post two themes a month and you can sign up for 12 of one type, 24 of one type, or 12 of each (24 total). The blocks end at 3.5" square, hence the "bitty."

That's it for Bees, although I had considered joining Nubees, where you sign up to make 5 blocks every month. Looking at my current list, maybe that plan will have to fall by the wayside for a bit.

I also signed up as a quilter for the Hurricane Sandy Block Drive hosted by Michele at the Quilting Gallery. I have received my first stack of blocks and plan to do QAYG to put the quilt together.

In addition, I have started a baby quilt for a Charity Drive hosted by Pigtales and Quilts. I have all of the scrappy log cabin blocks done and have even sewed on a solid purple border. But I want to do a second scrappy border and then of course it needs to be quilted and bound.

I am also working on various other projects, both quilting and others, including two baby quilts with two more planned. I'm clearly crazy! But I love it.