Friday, September 28, 2012

Color Bee Shocked - Full!

I think Color Bee Shocked is full! I'm so excited. I started filling out my questionnaire for November, I guess I'll be going fabric shopping this weekend.

Now I'm just hoping that everyone who signed up still wants to participate, since at least two one of our members have yet to post anything on our discussion boards. A little worried, but November is still a ways off, so even if I have to find replacements, that shouldn't be a huge problem.

My questionnaire so far:

What is your theme (if you want everyone to make a specific block type please provide a pattern to follow)?Circles, there must be at least one full circle on every block. They can be pieced, machine- or hand appliqued. Think outside the box (windows, the sun, the moon, and many other things can be circular). Many links for inspiration below.

Is there anything you don't want on your block (things sticking off the surface of the fabric, applique, etc.)?
Things sticking off the surface (definitely no yo-yo's, no buttons, etc.), flat applique and embroidery are fine.

What size block would you like (unfinished v. finished)?
12.5 inches square unfinished (you can also leave a little more room if you'd like, but I'll be cutting it down to 12.5x12.5), I also want a signature block of some sort (details TBD once I have the fabric, but will likely end up being a set size of one color fabric with your signature on it separate from the main block so I can incorporate it into the back of the quilt)

Do you have any particular instructions for the fabric (don't use a certain color as a background, use some of every fabric sent, etc.)?
TBD (don't have the fabric yet)

Can members use their own fabrics, or should we stick with yours? If yes, should it be washed or unwashed?
Yes, as long as it follows the same color story, is 100% cotton, and is pre-washed.

Can members make more than one block if they are feeling inspired?
Absolutely, go nuts.

Do you have preferences for thread color (white/off white/etc.)?
Whatever is in your sewing machine is fine.

Would you like people to send back any scraps?
TBD (don't have the fabric yet)

Please share any links that inspired your theme (flickr/pinterest/etc.).
Wonky Circle
Fussy Cut Center
Circle is only indicated
Pieced Circle
Many Circles
Rocket with a circular window
A birdhouse with a circular opening
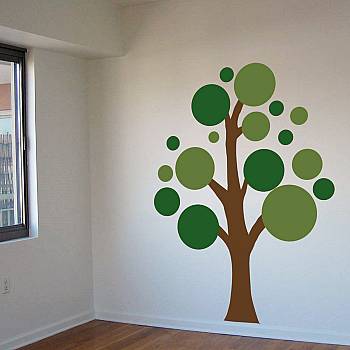
Not a block, but could easily be turned into one (aka tree with circle leaves)
If you want some great nature photography as inspiration

Thursday, September 27, 2012

Online Quilting Bee

I have been trying to find an online quilting bee for some time now, and since I wasn't finding the type of group I wanted that was still looking for members, I decided to start up my own group.
 
It will be a one year project, with each of the 12 people in the group choosing a theme for their assigned month and sending out the fabric needed to make at least one block. I will likely be going first, if we can fill up the group (we need 2 more people). I am already playing with various ideas for my blocks.
 
The group is housed at www.flickr.com/groups/colorbeeshocked. One of the members made some really cute buttons too.
 
I plan to post my blocks on here as well as in the Flickr group.
 

Bee3a

Sunday, September 23, 2012

Bug Crib Quilt


I started the Bug Crib Quilt a little over a month ago. The basis for the quilt was from the book Baby & Kids Quilts (Baby Blessings by Diane Tomlinson), although I knew that fussy cut center blocks just weren't my thing (even if I could have found them in my local fabric stores). Instead I decided to jump into the deep end and design my own center blocks. To the left are the fabrics I got for both the piecing and applique (along with a bunch of ribbon for the shinier bugs). 


The part that took the longest was definitely the 12 center square bugs and the 4 slightly larger corner square bugs. In the picture to the right, black ladybug with red spots, the blue beetle with black spots is Gibbifer californicus, next is a metallic wood-boring beetle or Sternocera aequisignata, bottom left is a gold scarab, followed by a rhino beetle, and a painted grasshopper.
In the left-hand picture, we have the following: Top Left: Large Milkweed Bug, Top Center: Weevil (unknown type), Top Right: Fiery Searcher (Calosoma scrutator), Bottom Left: Unknown, Bottom Center: Ladybug, Bottom Right: Blue Beetle (Chrysochroa mniszechi)
Finally, the 5 inch corner squares show the following: Red Dragonfly, Green Snaketail Dragonfly, Green Morpho Butterly. Rhetenor Blue Morpho Butterfly. All bugs were a combination of hand appliqued body and embroidered detail. Then I cut them down to the correct size. I think my favorite would have to be the Black Ladybug with red spots and the "regular" Ladybug as well as the Blue Beetle.

Next came the piecing on a variation of a traditional log cabin block with a bug at the center. I grossly overestimated the amount of fabric I would need for this process and ended up cutting all of my fabric into 2 inch strips. After finishing the blocks and seeing that I had almost half the fabric left over, I could have kicked myself. So much wasted scrap material. You live and you learn, I guess. Next I added the border strips and corner squares. Another life lesson learned: always test your fabrics to make sure they are heat resistant before you use them. The wings on the white and green dragonfly melted and I had to buy more fabric (organza instead of ribbon this time) and redo the wings and the center of the body. I heat tested it first this time on my iron's highest setting, not a singe.

I pieced rectangles using the 2 inch strips of fabric from the front as an off-center stripe for the back. I used a new technique for making the quilt sandwich (a huge thank you goes to Elizabeth Hartman over at Oh, Fransson!) which involved taping down the back piece before pin basting. I've never had such a nice, smooth back (my OCD couldn't be more pleased). I outline quilted the squares and log cabin blocks and straight line quilted the border pieces. They were originally going to be a 1/4 inch apart, but my laziness trumped my OCD in that case and they ended up being rather randomly spaced, which ended up making it more organic. Happy accident. Finally I used yet more of those 2 inch strips for the binding. Again a thanks goes to Elizabeth Hartman for the new technique I used, although next time I do that, I'll have to try it with 2.5" strips. That will probably make the mitered corners even better. Finished off the binding by hand sewing and then embroidered my initials and the year into the bottom corner.


Finished Quilt Front


Thursday, September 20, 2012

Circles Crib Quilt

My friends seem to be having babies one after the other right now. As soon as I was done with the Jungle Crib Quilt (from my last post), I moved onto a Circles Crib Quilt. I got the pattern out of Baby & Kids Quilts (Dots for Tiny Tots by Sharon Smith), but put my own twist on it with the color combinations I chose.


The whole design reminded me of bull's eyes. And I knew that my friend's only firm decisions about her nursery at the time, was that they would hang up maps and possibly letters. Since maps are usually in nice bright colors, I decided to go with that as well. I bought the varigated color sets from Joann's Fabric in blues, oranges/yellows, greens, purples, and pinks. Each set comes in five colors organized from lightest to darkest (1, 2, 3, 4, 5). I decided to use each color combination four times, which left me with the following sets from smallest circle to largest: 1234, 2345, 5432, 4321. That is a total of 80 circles that I cut out from fusible backing, fabric, sewed, and quilted around.
Another friend helped me find the backing fabric and also pointed me in the direction of the psychedelic butterfly fabric I ended up buying for the border. After setting the blocks into white sashing, I added the border. After pin basting the quilt sandwich I started quilting. The instructions said to quilt along all of the sashing, but I decided the circles were close enough together that quilting around them would be plenty. Trying to sew decreasing sizes of circles with a regular foot was difficult. I finally found a free-motion foot for my machine and the little plate that covers the walking feet, so next time I get the hare-brained idea to quilt around 80 circles, I'll have the proper tools to do so.
For the border, I bought a half circle cutting template and used it to draw half circles along the border on all four sides in tailor's chalk pencil and 3/4 circles at the corners. I also sewed along the outside border of the sashing strips. Finally I added the black binding, cut from the same fabric as the background of the squares. On the right, you can see the finished back with the black quilting showing. I really love how colorful the fabric is, and it pulls in the oranges from the front and adds a touch of red which seemed to be missing from the front. The quilt was well received at the baby shower.
Finished Quilt